Salesforce Integration
This article covers:
- Create New Salesforce Integration in Chisel
- Create and Configure a New Connected App in Salesforce To Get the Consumer Key and Secret
- Authorizing Salesforce Integration in Chisel to Import Opportunities
- How to Import Accounts From Salesforce Into Chisel?
- How to Configure Organization Custom Fields and Show Salesforce Details?
- PM Agent: Import Salesforce tool as an Input Context
If you are already using Salesforce, Chisel’s salesforce integration is the tool that will help you to import feedback and ideas into Chisel efficiently.
This article will guide you through the steps of connecting Chisel to your Salesforce account. We will also look at how you can authorize Salesforce integration in simple steps.
Requirements:
To get started, you will need the following:
- Chisel’s premium account with Admin maker rights
- A Salesforce enterprise account
- Organizations/accounts and opportunities in Salesforce
Note: A Chisel account with contributor access can’t proceed with any integration process. Learn more about the Chisel user roles.
Pro Tip: For now, at a time, only one Chisel workspace can be integrated with one salesforce account.
Create New Salesforce Integration in Chisel
- Click on ‘Integrations’ under the ‘workspace‘ pillar on the left navigation bar.
- Once you click on ‘Integrations,’ you will see a screen that shows you all the integrations you have set up(active integrations) and other integrations you can set up.
- Scroll down and click on the ‘connect’ button next to the salesforce icon.
Create and Configure a New Connected App in Salesforce To Get the Consumer Key and Secret
We’ll look at how you can create and configure a new connected app in salesforce.
Pro Tip: Before starting with salesforce integration, please check if you have an enterprise account (because it is a must-have to go ahead with the integration).
- In a separate tab, create an enterprise account on Salesforce. Now click on the ‘Setup’ menu icon in the top right corner.
- Once you do that, you will be brought to the salesforce setup page.
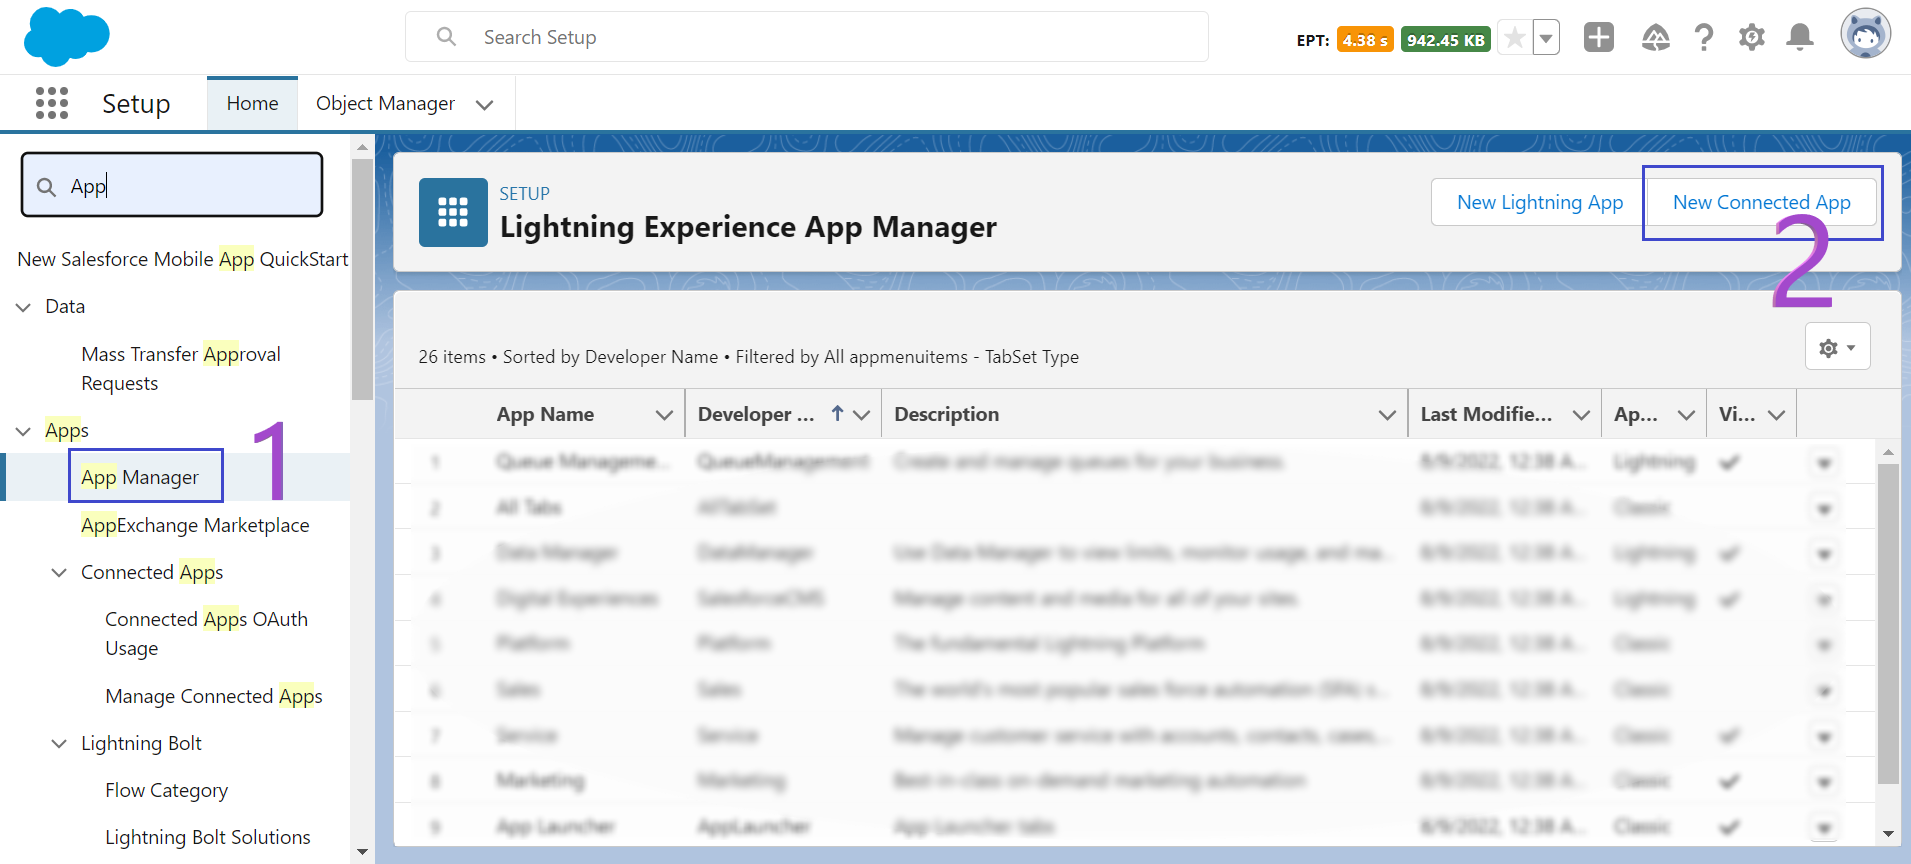
- In the ‘Quick find’ bar on the left side of the page, search for ‘App Manager.’
- From the two options on the page’s right side, click on the ‘New Connected App’ button.
- Now fill in the basic information such as ‘Connected App Name,’ ‘API Name,’ and ‘Contact Email,’
- Tick the box next to the Enable OAuth Settings in the ‘API (Enable OAuth Settings)’ section.
- In the Callback URL box, paste the following link:
https://app.chisellabs.com/all-settings/salesforce-integration/connect/salesforce
- Next, add the following two OAuth Scopes: Manage user data via APIs (api), Perform requests at any time (refresh_token, offline_access)
- Uncheck the box next to Require Proof Key for Code Exchange (PKCE) Extension for Supported Authorization Flows.
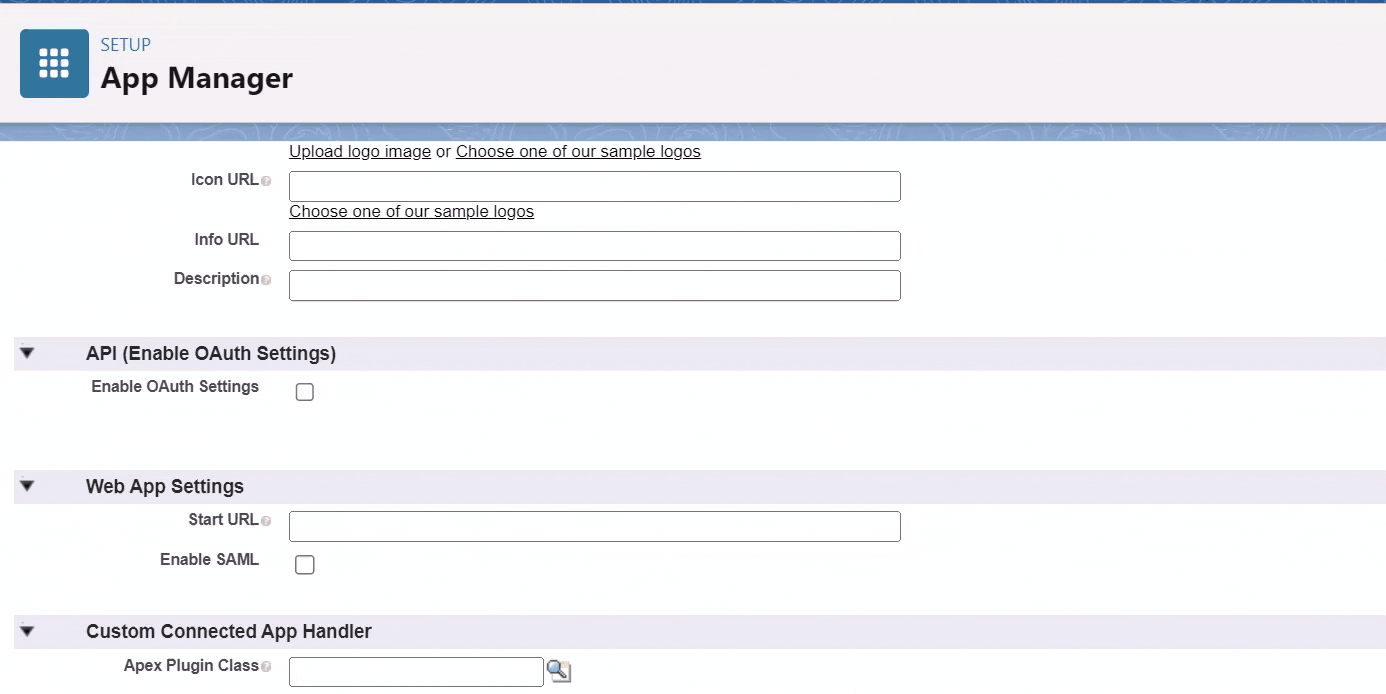
- Scroll to the end and click on the ‘Save’ button.
- Wait for about 10 minutes for salesforce to set up the changes.
- Once salesforce has set up your account, you will get two important links: Consumer key and Consumer secret.

Authorizing Salesforce Integration in Chisel to Import Opportunities
In the Chisel workspace, check if you have the ‘maker’ rights to begin the integration.
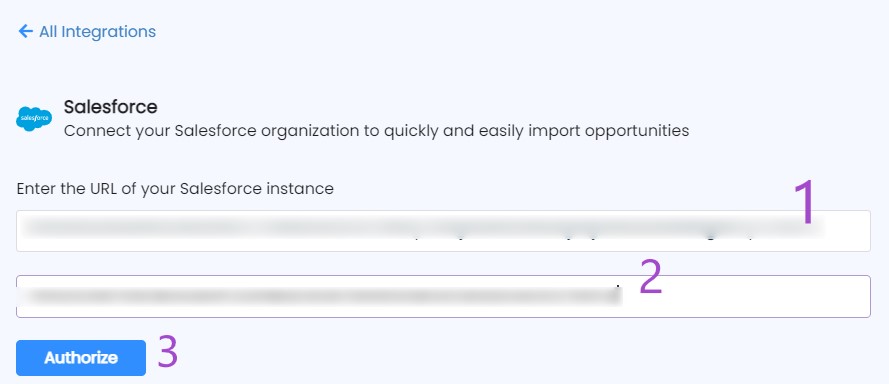
- Copy the ‘Consumer Key’ by clicking on the ‘copy’ button from the connected app view in salesforce under the section API( Enable OAuth Settings).
- Paste it in Chisel’s salesforce integration tab.
- Similarly, click on ‘Click to reveal’ and get your ‘Consumer Secret’ URL.
- Paste it in the chisel’s tab.
- Click on the ‘Authorize’ button.
Congratulations, you’ve authorized your salesforce integration! Now, only a few steps away from importing opportunities.
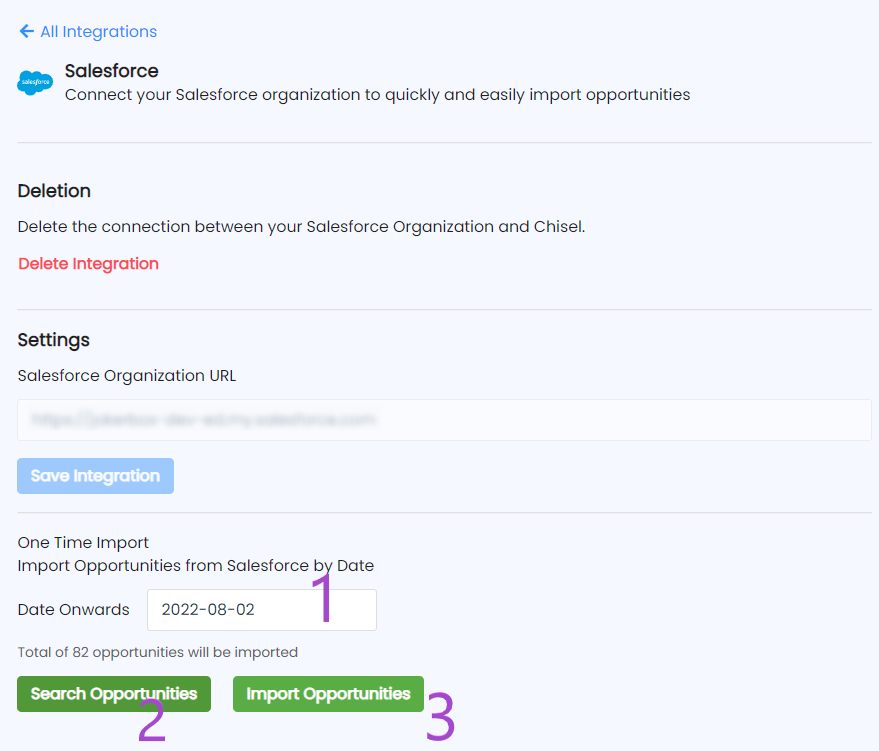
- To import opportunities in Chisel’s workspace, first put down the date in the box next to ‘Date Onwards.’
Pro tip: Ensure that you haven’t already imported the opportunities.
- The number of opportunities will be displayed once you enter the date, confirm it, and click on the ‘Import Opportunities’ button.
How to Import Accounts From Salesforce Into Chisel?
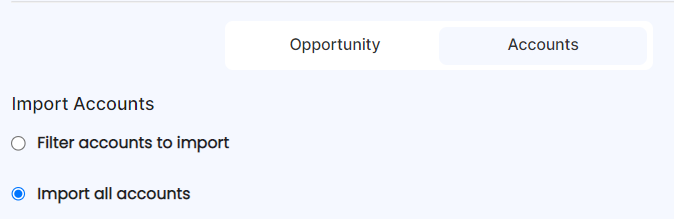
- To import accounts into Chisel from Salesforce, click on the ‘Accounts’ tab.
- Here you can select from the two options available. If you wish to import all accounts, check into that option.
- To add attributes, click on ‘+Add attribute’ and select the options as per requirement.
- Click on the ‘Save Attributes’ button.
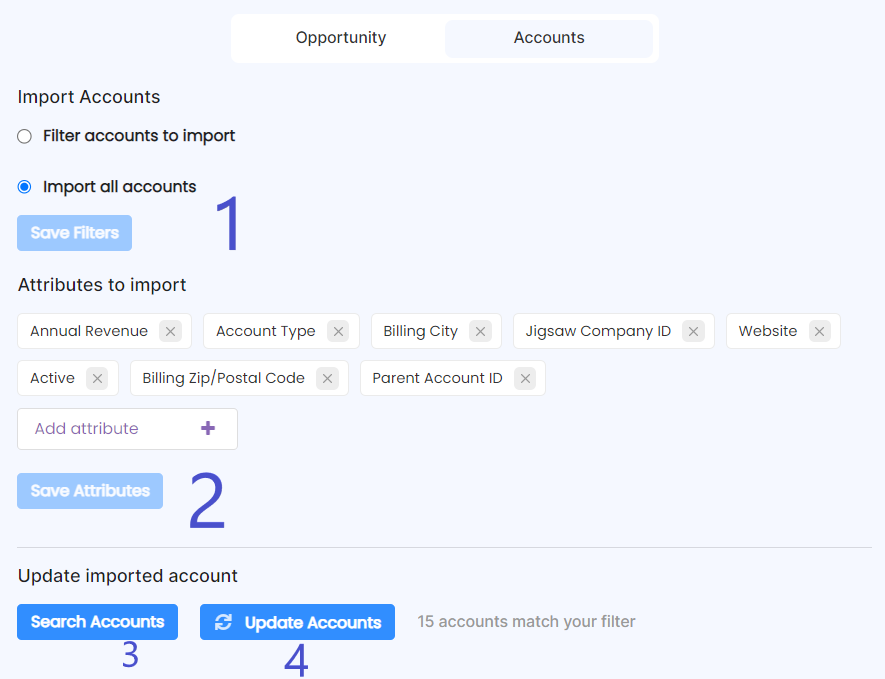
Pro tip: You can select as many attributes as need be.
- Once you have selected the necessary attributes, click on ‘Search Accounts’ in the ‘Update imported account’ section to know the number of accounts that match your filter.
- Finally, click on the ‘Update Accounts’ button to update your selected accounts successfully in the Organizations section of IdeaBox.
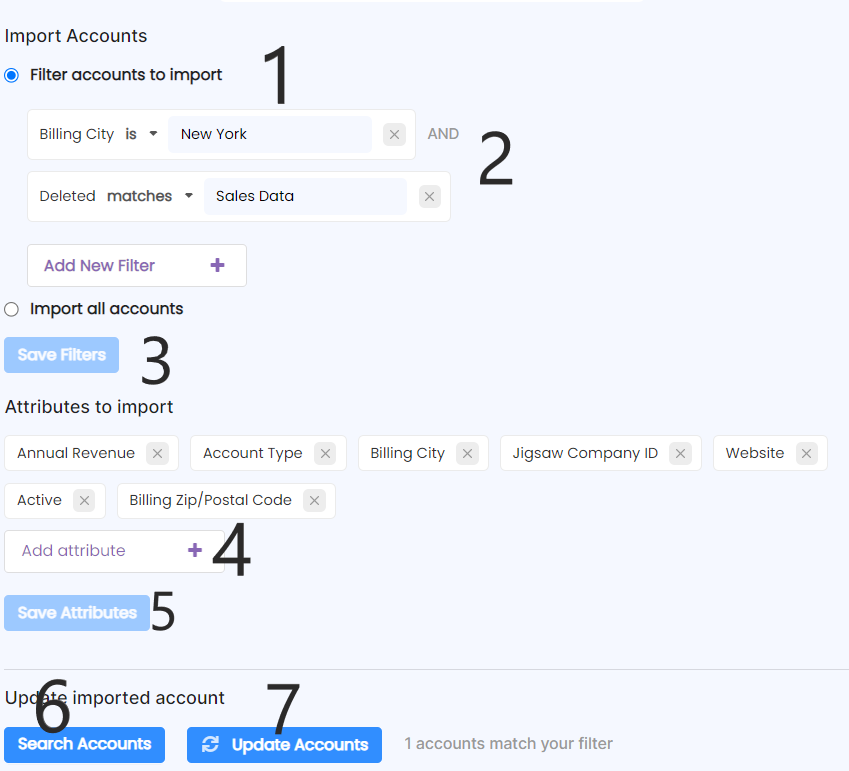
- If you wish to choose the accounts you need to import, check next to ‘Filter accounts to import.’
- Click on ‘Add New Filter’ and select the account.
- Once you select the account name, you will have three options ‘is,’ ‘contains,’ and ‘is not’. You can select any option and write accordingly in the box next to it.
For example, Master Record ID contains 254139
Billing City is not NY
Account type is standard
- Finally, click on the ‘Save Filters’ button. Follow the above steps.
View the Organizations
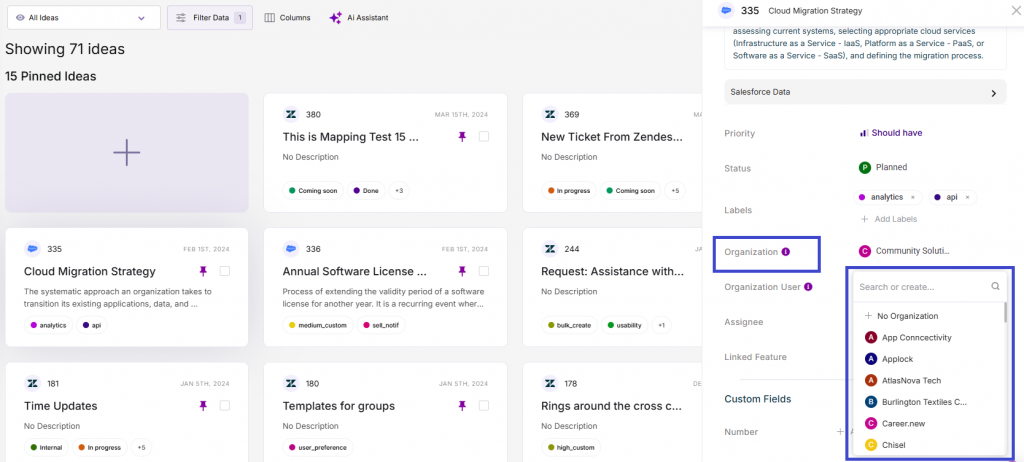
- To view the accounts, go to the Idea Box tool.
- Here click on any idea, and a side panel will appear.
- Expand the ‘Organization’ category, and all the imported accounts will be visible.
How to Configure Organization Custom Fields and Show Salesforce Details?
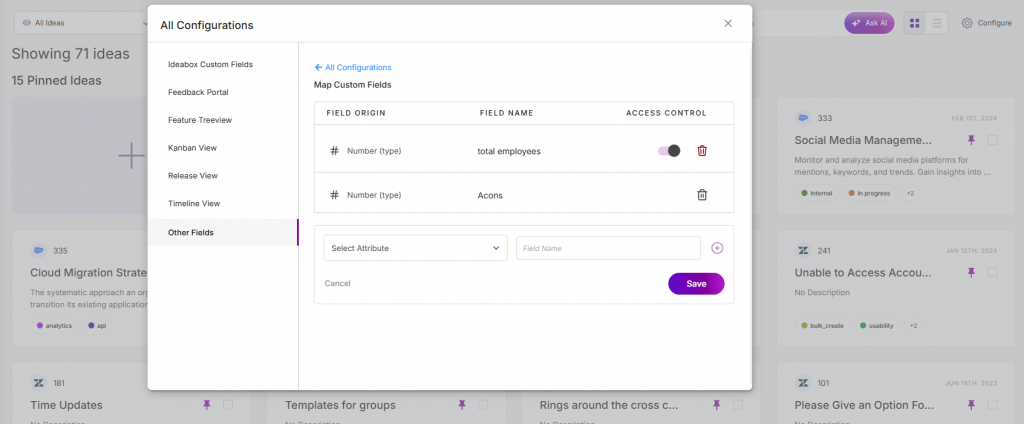
Do you need to add, remove and configure custom fields corresponding to Organizations? Configurations tool helps you configure fields based on your use case.
Find out more about the Configurations tool.
PM Agent: Import Salesforce tool as an Input Context

Bring in your Salesforce entity, such as the Opportunity, Case, Account or Task, when crafting your document using the PM Agent. This can enhance your prompt and the resulting document will include all the materials you asked for from Salesforce.
Know more about the connecting tools in PM Agent.