Connect Your Salesforce Configured Data With Chisel’s Idea Box
As a Salesforce user, you may have your very own configurations in Salesforce. In such cases, it can be a challenge to integrate natively with Salesforce in connection with Chisel. We have a solution. Taking into account your needs, we’ve made the below setup that suits YOUR workspace and brings in all that configured data into Chisel’s Idea Box.
Important: Having a deep understanding of Salesforce Developer Console and APEX programming language, and APIs would come in handy when setting this integration up.
This article covers:
Overview of the Demo Integration
For simplifying purposes, we’ll connect a custom object in Salesforce with Chisel through Apex and auto-import functionality. Every time you create a custom object in Salesforce, a corresponding entity is created in Chisel as well, provided you follow the steps outlined below. The custom object, in Salesforce, that we’ve created as a demo is called Customer Feedback.
What is an Apex?
In Salesforce, “Apex is a strongly typed, object-oriented programming language that allows developers to execute flow and transaction control statements on Salesforce servers in conjunction with calls to the API.”
In layman’s terms, our customers can use the customized code scripts provided below to send requests to Chisel’s Idea Box to reflect the data in their Salesforce system by hosting these scripts within Salesforce.
How to Set Up the Integration?
There are five steps to getting this integration in order:
Step No.1:
Create the Custom Object in Your Salesforce Space
- Go to Setup
- Open the Object Manager
- Create a New Object titled, for example, Customer Feedback, by referring to the labels and API names in the table below.
Note: Keep in mind that the API names you use to create the custom object will be used in the Apex files when setting up the trigger.
To avoid discrepancies when creating your API names, ensure that you do not include the “__c” given in the table below. That is automatically added for you.
Here’s a table of the labels of the sample object for your reference:

Important: You have the flexibility to edit the fields of your Chisel Ideas in Salesforce. However, Do Not Forget to also update the Apex classes, triggers and tests too, to match those changes.
Step No.2:
Create Apex Triggers and Classes
Go to your Salesforce Developer Console, and build the following FIVE APEX Scripts, namely:
- One Trigger
- Two Classes
- Two Test Classes

To set up your own integration, you’ll need to create Apex triggers and classes. The code below, which includes scripts (classes and triggers), is designed with the above example of a custom object (Customer Feedback) in mind.
You can use the script below as a blueprint to build an integration for your custom object, which you may have already created in Salesforce.
Trigger A: ChiselCustomerFeedbackTrigger
```Apex
// 1. Name your Trigger based on the object you want to connect - Chisel<ObjectName>Trigger
// Example: ChiselCustomerFeedbackTrigger

trigger ChiselTrigger on Customer_Feedback__c (after insert) {
    for (Customer_Feedback__c feedback : Trigger.new) {
        String action = Trigger.isInsert ? 'CREATE' : 'UPDATE';
        ChiselPayloadStructure payload = new ChiselPayloadStructure(action, feedback);

        // Inject all the related object's data (if exist) in below format to webhook payload
        // Example: Injecting Account's data to our custom (Customer_Feedback__c) object
        if (feedback.Account__c != null) {
            List<Account> accounts = [SELECT Id, Name, Website FROM Account WHERE Id = :feedback.Account__c LIMIT 1];
            if (!accounts.isEmpty()) {
                payload.populateRelated('Account', accounts[0]);
            }
        }

        String payloadStr = JSON.serialize(payload);
        ChiselWebhookNotifier.notifyChange(payloadStr);
    }
}
```
Class A: ChiselWebhookNotifier
Updates Required:
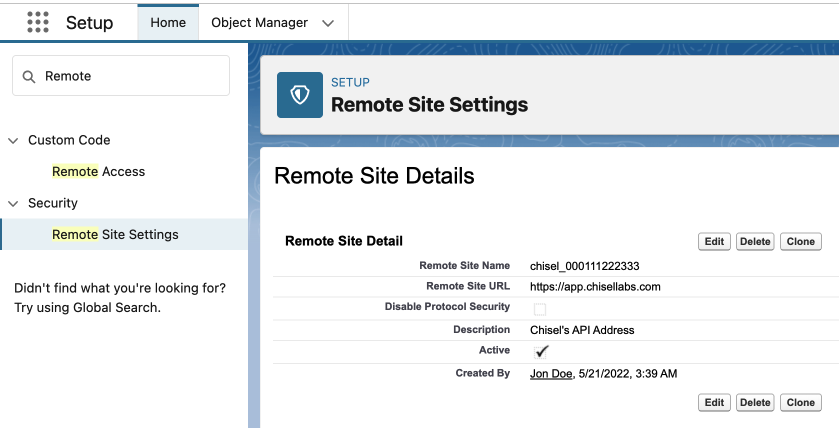
- Make sure to add ‘https://app.chisellabs.com‘ to ‘Remote Site Settings’ (refer appendix)
```Apex
public class ChiselWebhookNotifier {

    @future(callout=true)
    public static void notifyChange(String payload) {
        Http http = new Http();
        HttpRequest req = new HttpRequest();

        req.setEndpoint('https://app.chisellabs.com/api/salesforce-integration/webhook');
        req.setMethod('POST');
        req.setHeader('Content-Type', 'application/json');
        req.setBody(payload);

        try {
            HttpResponse res = http.send(req);
        } catch (Exception e) {
            System.debug('Chisel Webhook Error: ' + e.getMessage());
        }
    }
}
```
Class B: ChiselPayloadStructure
Updates Required:
- Add your Chisel’s Integration ID below on line 4, this can be found on Integrations page > Salesforce (refer appendix)
```Apex
public class ChiselPayloadStructure {
    // Add your Chisel's Integration ID below
    public String chiselIntegrationId = '<ADD YOUR CHISEL INTEGRATION ID HERE>';
    public String salesforceWorkspaceId = UserInfo.getOrganizationId();
    public String action;
    public Map<String, Object> data;

    public ChiselPayloadStructure(String actionType, SObject record) {
        this.action = actionType;
        this.data = toMap(record);
    }

    public void populateRelated(String fieldName, SObject relatedRecord) {
        if (relatedRecord != null) {
            Map<String, Object> relatedMap = toMap(relatedRecord);
            fieldName = fieldName + '__r';
            this.data.put(fieldName, relatedMap);
        }
    }

    private static Map<String, Object> toMap(SObject record) {
        return (Map<String, Object>) JSON.deserializeUntyped(JSON.serialize(record));
    }
}
```
Test Class A: ChiselTriggerTest
```Apex
@isTest
public class ChiselTriggerTest {
    @isTest
    static void testInsertAndUpdateTrigger() {
        Test.setMock(HttpCalloutMock.class, new ChiselMockCallout());

        // Create related Account
        Account acc = new Account(Name = 'Test Account', Website = 'https://test.com');
        insert acc;

        // Create Customer Feedback record
        Customer_Feedback__c feedback = new Customer_Feedback__c(
            Name = 'Test Feedback',
            Content__c = '<h1>This is a test feedback content!</h1>',
            Priority__c = 'Low',
            Account__c = acc.Id,
            // add any required fields here
        );
        insert feedback;

        // Assertions after insert
        System.assertNotEquals(null, feedback.Id, 'Customer Feedback record should be inserted.');

        // Modify the record to test update
        feedback.Priority__c = 'High';
        update feedback;

        // Optional: check debug logs manually or assert side effects if any
        System.assertEquals(feedback.Priority__c, 'High', 'Priority must be equal!');
    }
}
```
Test Class B: ChiselMockCallout
```Apex
// The mock response when running the test
global class ChiselMockCallout implements HttpCalloutMock {
    global HttpResponse respond(HttpRequest req) {
        HTTPResponse res = new HttpResponse();
        res.setHeader('Content-Type', 'application/json');
        res.setBody('{"success": true, "message": "Chisel webhook completed!"}');
        res.setStatusCode(201);
        return res;
    }
}
```
Step No.3: Testing a Trigger
Once you’re done setting up your files, we’ll test the trigger by creating the Customer Feedback in Salesforce to check if the setup is working as expected.
- Check the logs by clicking on the ChiselTrigger file
- Double-click on the FutureHandler Operation
- Tick mark inside the Debug Only checkbox

Step No.4: Testing the Trigger for Coverage to Deploy it
Brace yourselves for this step. You can deploy this integration into production, only and only if the trigger passes a test.
- The two above files- ChiselTriggerTest and ChiselMockCallout are created to ease this step.
- Run a test by clicking on the ChiselTriggerTest file and hitting the Run Test button at the top right corner of the Developer Console.
- The Code Coverage of the Test should be more than 75% to successfully deploy the integration to production.
- Click on the Tests tab, to view the Overall Code Coverage which will be displayed at the bottom right of your screen.

Step No.5: Deploying the Trigger to Production
Once all the setup and testing are completed, it is necessary to create an outbound change to upload and deploy the tested trigger to production successfully. This link will help you with the process of deploying the components to production.
Auto-import
To keep the sync on- bringing all the newly added data to Idea Box, enable the toggle of Auto-Import inside the Configure button and you’re good to go! Rest assured all your data will be in sync without having to worry about doing it manually.

Once the above setup is completed, all your configured data will be available for you to fetch and view in Chisel’s Idea Box as Idea cards.
Have a look at the images below to see what the Ideas look like in Chisel:

And the Salesforce view:

Appendix
- Finding Chisel’s Integration ID

2. Creating Remote Site Settings